Mirror Bot Deploy Guide
Telegram Mirror Leech Bot Deploy Guide
Requirements
Telegram Account
Github Account
Install Python on Windows 10 (from CMD)
Google Drive Account (connected to Shared Drive / Team Drive)
Create Telegram API ID and HASH
Open my.telegram.org (register with your number connected to telegram account
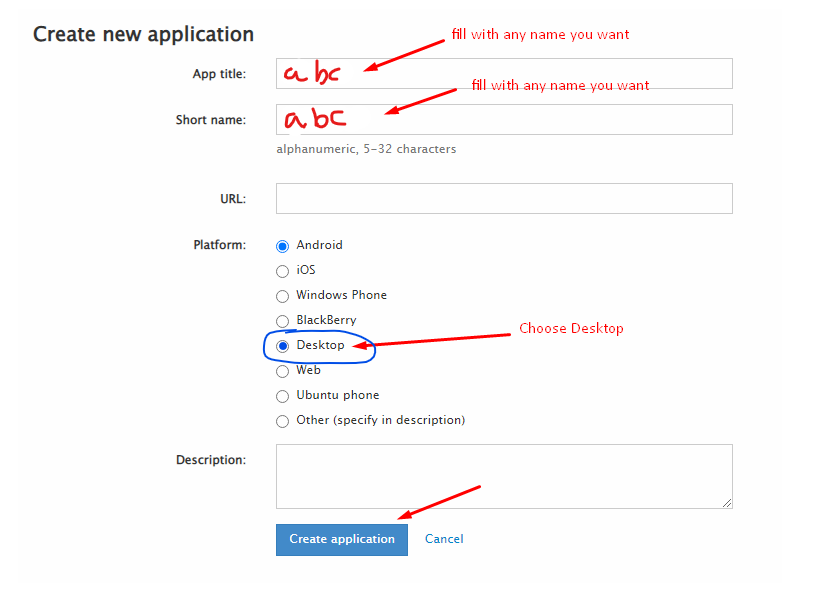
Fill with your number , Choose Desktop, Fill App title and Short name to any name you want.
the values will be
-- App api_id :
-- App api_hash :
Create Telegram NEW BOT
Open @BotFather
save Bot Token
Create /Newbot (edit bot pic, about)
Create credentials.JSON in Google Cloud Console
Open console.developers.google.com/apis/credentials (see in Video how to create it)
renamed to credentials.json the save to "Bot credentials" folder
ENABLE Required API
- Go to console.cloud.google.com/apis/library
--- ENABLE Google Drive API
--- ENABLE Identity and Access Management (IAM) API
Create Token.Pickle + Token_sa.Pickle + Service Accounts JSON Files from Windows CMD
- Open CMD in gdrive tools directory
curl https://bootstrap.pypa.io/get-pip.py -o get-pip.py
python get-pip.py
pip -V (to confirm it's properly installed)
Generate Token.pickle
- copy paste credentials.json from "Bot credentials" folder to mltb folder
pip install google-api-python-client google-auth-httplib2 google-auth-oauthlib
python3 generate_drive_token.py
- save token.pickle to "Bot credentials" folder
ALTERNATIVE COMMAND
in case python3 command not working / not installed properly in your windows system. you can use python only command without 3 at the end
example below :
python generate_drive_token.py
Generate Token_sa.pickle + SA Accounts folder
python -m pip install progress
python3 gen_sa_accounts.py --quick-setup 1 --new-only
- save SAs (service accounts) folder and token_sa.pickle to "Bot credentials" folder
ALTERNATIVE COMMAND
in case python3 command not working / not installed properly in your windows system. you can use python only command without 3 at the end
example below :
python gen_sa_accounts.py --quick-setup 1 --new-only
Add Service Account to SHARED DRIVE / TEAM DRIVE
- Open POWERSHELL in windows Accounts folder
- Copy Paste this command
$emails = Get-ChildItem .\**.json |Get-Content -Raw |ConvertFrom-Json |Select -ExpandProperty client_email >>emails.txt
- For linux
grep -oPh '"client_email": "\K[^"]+' *.json > emails.txt
Go to groups.google.com
create a new group (DON'T add SA in the 3rd step while creating group)
open your group, go to members tab and press 'Add Members'
Copy all mails from \accounts\emails.txt and paste in 'Group members' field, then press 'Add Members'
open your SHARED DRIVE and add this google group (it will be something like
your@googlegroups.com) as 'Content Manager'. Done!Don't forget delete emails.txt in your local drive
Alternative
- add all the service accounts to your team drive by running this:
python3 add_to_team_drive.py -d YourSharedDriveID
- If this does not work use
python add_to_team_drive.py -d YourSharedDriveID
- You may check your team drive in order to see whether the service accounts are added or not. If it's added by 100 people, then it works. You can check the members too.
Make Index Listing with Bhadoo
Go to dash.cloudflare.com
Create Index Workers
Copy Paste Index Code.txt
combined all SAs (Service Account) Credential in one note.txt by copy paste
-- Open CMD from accounts folder then Copy Paste this-->
copy 0.json + 1.json + 2.json + 3.json + 4.json + 5.json + 6.json + 7.json + 8.json + 9.json + 10.json + 11.json + 12.json + 13.json + 14.json + 15.json + 16.json + 17.json + 18.json + 19.json + 20.json + 21.json + 22.json + 23.json + 24.json + 25.json + 26.json + 27.json + 28.json + 29.json + 30.json + 31.json + 32.json + 33.json + 34.json + 35.json + 36.json + 37.json + 38.json + 39.json + 40.json + 41.json + 42.json + 43.json + 44.json + 45.json + 46.json + 47.json + 48.json + 49.json + 50.json + 51.json + 52.json + 53.json + 54.json + 55.json + 56.json + 57.json + 58.json + 59.json + 60.json + 61.json + 62.json + 63.json + 64.json + 65.json + 66.json + 67.json + 68.json + 69.json + 70.json + 71.json + 72.json + 73.json + 74.json + 75.json + 76.json + 77.json + 78.json + 79.json + 80.json + 81.json + 82.json + 83.json + 84.json + 85.json + 86.json + 87.json + 88.json + 89.json + 90.json + 91.json + 92.json + 93.json + 94.json + 95.json + 96.json + 97.json + 98.json + 99.json combined.txt
in notepad: ctrl + F , Replace "}" with "}, " <-- after coma , with [space]
copy paste SA credentialsn replace to {}
Save INDEX URL
Generate Database
- Using Railway
Go to railway and create account
Start new project
Press on Provision PostgreSQL
After creating database press on PostgresSQL
Go to Connect column
Copy Postgres Connection URL and fill DATABASE_URL variable with it
- Using ElephantSQL
Go to elephantsql and create account
Hit Create New Instance
Follow the further instructions in the screen
Hit Select Region
Hit Review
Hit Create instance
Select your database name
Copy your database url, and fill DATABASE_URL variable with it
- Fly.io
Docker Install and Deploy
sudo apt update -y ; sudo apt upgrade -y; sudo apt autoremove -y; sudo apt install docker-compose -y
- Got to the respective folder where docker-compose.yml file is present
sudo docker-compose up --build
Gdtot Cookies
To Clone or Leech gdtot link follow these steps:
- Login/Register to gdtot.
- Copy this script and paste it in browser address bar.
- Note: After pasting it check at the beginning of the script in broswer address bar if
javascript:exists or not, if not so write it as shown below.
javascript:(function () {
 const input = document.createElement('input');
 COOKIE = JSON.parse(JSON.stringify({cookie : document.cookie}));
 input.value = COOKIE['cookie'].split('crypt=')[1];
 document.body.appendChild(input);
 input.focus();
 input.select();
 var result = document.execCommand('copy');
 document.body.removeChild(input);
  if(result)
    alert('Crypt copied to clipboard');
  else
    prompt('Failed to copy Crypt. Manually copy below Crypt\n\n', input.value);
})();- After pressing enter your browser will prompt a alert.
- Note: After pasting it check at the beginning of the script in broswer address bar if
- Now you'll get Crypt value in your clipboard
NGxxxxxxxxxxxxxxxxxxxxxxxxxxxxxxxxxxxxxxxxxxxxxxxxxxWdSVT0%3D - From this you have to paste value for CRYPT in config.env file.
Credits
Thanks to all Devs who contributed in Project
&